The aim of this breathing exercise is to completely empty the lungs so that when you breathe in you get a complete refill of air and prana into the lungs. The air fills the lungs in 3 phases just like liquid flowing into a cup: the bottom first, then the middle and then the top. To help you breathe more consciously and thus more deeply, you position the hands in 3 different locations as the inhalation takes place. This helps you visualise the flow of the breath which makes the exercise even more powerful.

Note: You never actually empty the lungs completely, as to do so would make the lungs collapse. But you are aiming for nearly empty.

As you exhale, you make the sound A-U-M: ‘A’ as the breath leaves the upper part of the lungs, ‘U’ as it leaves the middle part, and ‘M’ as it exits the lower part. ‘Om’ is the favorite mantra of the yogis because it is believed to be the sound that brought the universe into existence.

  • Lie on your mat with your knees bent and hip-width apart. (You can also do the exercise sitting up).
  • Lengthen your neck by clasping your hands behind your head and lifting it off the floor slightly. Slide your hands over the back of the head towards the crown, feeling your neck release to its maximum. Then carefully, replace the back of the head on the floor.
  • Place your finger tips on your lower ribs with your fingers, loose and relaxed.
  • Look up at the ceiling. Open your eyes as wide as possible, look down at the tip of the nose and then gradually, draw the eyelids down over the eyes.
  • Inhaling, take your right shoulder off the floor and broaden it out to the side. Exhaling, replace it down on the floor again. Repeat on the left side.
  • Allow the skin on your face to relax and soften. Also soften the skin on the soles of the feet and on the palms of your hands. Soften the inner ears.
  • Inhale deeply, and exhale through the mouth with a nice, long sigh.
  • Go back now to breathing in and out through the nose only. Every time you exhale, allow the back to settle into the floor.
  • Begin now to observe your breath. Listen to its sound: ‘So’ as you inhale, and ‘Ham’ as you exhale. Feel the throat soften and relax.
  • The next time you inhale, visualise the breath entering the bottom part of the lungs where your fingers are located. As you exhale, make the sound ‘A’ (as in father). Allow the sound to vibrate for the entire duration of the out-breath. Continue for 6 breaths.
  • Now, place your fingers into your armpits. As you inhale, visualise the breath entering the middle part of the lungs only, again in line with where the fingers are positioned. As you exhale, make the sound ‘U’ (as in room). Continue for 6 breaths.
  • Now, place your fingers on your collar bones. As you inhale, visualise the breath entering the top part of the lungs, just under your fingers. As you exhale, make the sound ‘M’ (as in hum). Continue for 6 breaths.
  • Go back to your normal breathing for a few breaths and relax the arms down by your sides.
  • Now, think about putting it all together. Place the fingers on the lower ribs again. Inhale into the lower lungs. As you feel the breath moving up into the middle lungs, move the fingers into the armpits. Then place the fingers on the collar bones as the breath enters the top part of the lungs. As you exhale, relax your arms by your sides and say your mantra A-U-M, as the breath gradually departs from the body:  ‘A’ as the breath leaves the upper lungs, ‘U’ as it leaves the middle, and ‘M’ as it exits the lower lungs. When you get to ‘M’, see can you squeeze that last bit stale bit of air out of the lungs. Continue for 6 breaths.
  • Return to your normal breathing, paying more attention to the inhalation to help you become more alert. Stretch your arms behind you and the legs out in front of you. Inhaling, stretch the entire right side of the body. Exhale, and release. Repeat on the left. Repeat once more on both sides.
  • Roll over on to one side, and supporting the back of the head with one hand, come back up to sitting again.

The Breath of Tranquillity does what it says on the tin – it calms and soothes. However, as I have explained before, the aim is never to impose a new regime on your breathing process, but to expand on the way you normally breathe, and get the most out of it. Breathing is a wonderful way to teach you how to listen to the body. With all the senses shut down apart from hearing and feeling, you become very attuned to what the body is trying to tell you. If the breath sounds harsh or strained in any way, you are over breathing which can disrupt the nervous system and even damage lung tissue. If you find yourself having to take little breaths in between the breaths you are counting, then you are holding the breath for too long and the distribution of gases in the lungs has become unbalanced. Go back to your normal breathing process for a few breaths. When you are ready, resume the breathing exercise, and try inhaling and retaining the breath for a shorter count.

  • Lie on your mat with your knees bent and hip-width apart.
  • Lengthen your neck by clasping your hands behind your head and lifting it off the floor slightly. Now slide your hands over the head towards the crown, feeling your neck release to its maximum. Then carefully, replace the back of the head on the floor.
  • Place your finger tips on your lower ribs with the fingers nice and relaxed.
  • Look up at the ceiling. Open your eyes as wide as possible, look down at the tip of the nose and then gradually, draw the eyelids down over the eyes.
  • Inhaling, take your right shoulder off the floor, broaden it out to the side as much as possible. Exhale, and replace it down on the mat again. Repeat on the left shoulder.
  • Allow the skin on your face to soften. Also soften the skin on the palms of the hands and on the soles of the feet. Soften the inner ears.
  • Inhale through the nose, and then exhale slowly through the mouth with a nice, long sigh. Go back to breathing in and out through the mouth.
  • Now begin to observe the breath: the air as it travels up through the nostrils; the tiny gap at the end of the inhalation; the passage of air as it travels back down the nasal passage again; the tiny pause before the new breath begins. Listen to the sound of the breath and continue to watch it in this way for a few moments.
  • The next time you breathe in, count how long it takes, slowly, e.g. one hundred and one, one hundred and two and so on. Do the same with the exhalation.
  • If the count differs for the inhalation and exhalation (it usually does), see can you even them up, gradually. Think of practicing a yoga pose where you try and stretch the body a little more each time. It’s the same here. See can you stretch the breath a little more, taking in more air than last time or letting more out air, as the case may be.
  • When the inhalation and exhalation are even, see can you hold the breath for half the time it takes to inhale/exhale. For example, if you inhale/exhale for 4, hold the breath for the count of 2; if you inhale/exhale for 6, hold the breath for 3 and so on. (Obviously this won’t work on odd numbers, so if you have to, wangle it until you are working only with even ones). DO NOT hold the breath after exhalation.
  • Continue breathing in this way for several breaths.  If you are following the 4 – 2 – 4 count, you can increase it after a few breaths to the 6 – 3 – 6 count, and then again if you wish to 8 – 4 – 8. Keep listening to the breath making sure that everything is smooth and harmonious.
  • Then, return to your normal breathing. Begin to pay more attention to the inhalation to help you become more alert. Stretch your arms behind you and your legs out in front of you. Inhaling, stretch the whole right side of the body, extending the arm out of the shoulder and the leg out of the hip. Exhale, and release. Repeat on the left side. Repeat again on both sides.
  • Roll over to one side, and supporting the back of the head with one hand, come back up to sitting again.

Hi everyone!

Hope you are all having a good summer and that you are practicing lots of yoga with all the rain keeping you inside! I will be teaching the following classes in Mullingar this autumn:

Mondays  7 – 8.30 p.m. Yoga & Ayurveda in Mullingar Community College. Starts 24 September 2012. If you want to book a place, you will have to contact them directly @ 044-9340786

Tuesdays 7 – 8 p.m. Beginners Yoga in the Parish Community Centre, Bishopsgate St. Starts 4 September 2012. This course covers modified forms of the yoga postures as discussed in this blog. It is suitable for anyone who wants a more gentle form of yoga, regardless of whether you are a beginner or not. Fee: 6 weeks – 50 Euro. To book a place, you can text or phone me @ 087 930038

Wednesdays 7 – 8 p.m. Continuation Yoga in the Parish Community Centre, Bishopsgate St. Starts 5 September 2012. You must complete the Beginners course first before joining this class. Fee: 6 weeks – 50 Euro. To book a place, you can text or phone me @ 087 9300380

Below I have listed a few tips for getting the most out of your yoga class:

  • Do not eat for at least 2 hours before a class. This is because when you take food, your body’s No.1 priority is to digest whatever you have eaten. This means you won’t have very much energy left over for yoga. Plus, imagine standing on your head after consuming a big bowl of chilli…enough said.
  • Wear comfortable clothing and bring a yoga mat and a blanket to class. If you don’t have a blanket, a thick towel, like a beach towel will do.
  • Please inform me of any medical conditions or injuries that you have. In this way I can adapt the class plan to suit your needs.
  • Yoga is practiced in bare feet. Don’t worry about this. Everyone thinks their feet are the ugliest in the world. Rub some coconut oil into them before you go to bed and their condition will improve. Feet are very forgiving.
  • Yoga is non-competitive. The aim is not to get or achieve anything but to have some quiet time to make a connection with yourself. It’s what happens on your mat that counts. You change the world by changing yourself first.
  • People often get confused by when to breathe in and when to breathe out. The most important thing is to just to keep breathing. However, when in doubt, breathe out! If you are a total beginner of yoga, think of yourself as standing at the tip of a tip of a gigantic iceberg. That’s how vast the system of yoga is. Give yourself lots of time to learn it.
  • Drink plenty of water after the class to flush out the toxins that have been released with all the stretching and breathing.
  • Most important of all, enjoy the class and don’t be afraid to try out what you learn at home.

Hope to see you all again, soon,

Orla

Now that I have finished documenting all of the positions that I teach to beginners, (yahoo!), it’s time to put it all together. Below you will find sequences of poses that you could follow for a 1 week period. In my experience, themes work best. For example, on day 1 you work on toning the legs; day 2 on the hips;  on day 3 you work on lenghthening the spine;  day 4 on the arms and shoulders; on day 5 you work on balance and coordination; on day 6 you do a relaxing and restorative sequence; and on day 7 you can take a rest! If you manage 6 days in a row of yoga, you’ve definitely earned it.

Always start your yoga session with a breathing exercise. This will help you center and relax yourself and will also help you focus on your yoga practice. While still lying on your mat, do the warm ups for the legs, hips and spine. Then practice Mountain Pose followed by warm ups for the arms, shouders and neck. Next, practice as many positions from the sequence as possible,depending of course on the time available to you and your energy levels on that day. If your energy is low, for example, during menstruation, or if you are recuperating from an illness, practice the relaxation & restoration sequence for a couple of days or until you feel hale and hearty again. Always cool down after the session and finish up with 10 minutes Savasana (Relaxation Pose). ALWAYS, ALWAYS close yourself down at the very end of the practice in the same way you would close down your computer at the end of a day’s work. (See Category on Relaxation – Savasana). (See also category on How to practice yoga at home for more tips).

Day 1 (Stretching & Toning the Legs)

  • Choose one of the Breathing Exercises 1-7 (See Breathing).
  • Warmups for legs,hips and spine (See Warmups).
  • Mountain Pose (See Standing Positions).
  • Warmups for Shoulders, arms and neck.  (See Warmups).
  • Supine Big Toe Pose (See Warmups).
  • Serpent Pose (Seated Positions).
  • Tree Pose (Standing Positions).
  • Powerful Pose (Standing Positions).
  • Squatting Pose (Standing Positions)
  • Wide Leg Forward Bend (Standing Positions).
  • Cooling down: Legs up the Wall (See Relaxation).
  • Savasana (See Relaxation)

Day 2 (Opening the Hips)

  • Choose one of the Breathing Exercises 1-7 (See Breathing).
  • Warmups for legs, hips and spine (See Warmups).
  • Mountain Pose (See Standing Poses).
  • Warmups for shoulders, arms and neck (See Warmups)
  • Serpent Pose (See Seated Positions).
  • Squatting Pose (See Standing Positions).
  • Triangle Pose (See Standing Positions).
  • Butterfly Pose (See Seated Positions).
  • Seated Angle Pose (See Seated Positions).
  • Cooling down: Supine Butterfly Pose against wall. (Relaxation – Legs up the Wall).
  • Savasana (See Relaxation).

Day 3 (Lengthening the Spine)

  • Choose one of the Breathing Exercises 1-7 (See Breathing).
  • Warmups for legs, hips and spine. (See Warmups).
  • Mountain Pose (See Standing Positions).
  • Warmups for Shoulders, arms and neck. (See Warmups)
  • Cat Pose (See Warmups).
  • Child Pose going forwards (See Seated Positions).
  • Powerful Pose (See Standing Positions).
  • Half-Dog Pose (See Standing Positions).
  • Standing Twist (See Standing Positions).
  • Cooling down: Legs up the Wall (See Relaxation).
  • Savasana (See Relaxation).

Day 4 (Opening & Toning Shoulder Area; Toning Arms)

  • Breathing Exercise: Clock along the Floor (See Breathing).
  • Warmups for legs, hips and spine. (See Warmups).
  • Mountain Pose (See Standing Positions).
  • Warmups for shoulders, arms and neck (See Warmups).
  • Kneeling Pose + Variations (See Seated Positions).
  • Warrior I (See Standing Positions).
  • Triangle Pose (See Standing Positions).
  • Extended Side Angle Pose (See Standing Positions).
  • Cooling down: Child Pose
  • Savasana (See Relaxation).

Day 5 (Improving Balance & Coordination)

  • Practice Breathing Exercise (7) – Counting back from 11 (See Breathing).
  • Warmups for legs, hips and spine (See Warmups).
  • Mountain Pose (See Standing Positions.
  • Warmups for shoulders, arms and neck (See Warmups)
  • Serpent Pose (See Seated Positions).
  • Squatting Pose (See Standing Positions)
  • Tree Pose (See Standing Positions).
  • Warrior I (See Standing Positions).
  • Extended Side Angle Pose (See Standing Positions).
  • Cooling down: Legs up the Wall (See Relaxation).
  • Savasana (See Relaxation).

Day 6 (Relaxation & Restoration)

  • Choose one of the Breathing Exercises 1-7 (See Breathing Exercises).
  • Warmups for legs, hips and spine (See Warmups).
  • Clock along the floor (See Breathing Exercises).
  • ‘Ha Cleansing Breath’ (   ”        ”                     ”                ).
  • Mountain Pose (See Standing Poses).
  • Warmups for shoulders, arms and neck. (See Warmups).
  • Seated Twist (See Seated Positions – Easy Pose).
  • Lion Pose (See Seated Positions )
  • Releasing the Neck in Rabbit Pose (See Seated Positions).
  • Cooling down: Legs up the Wall (See Relaxation).
  • Savasana (See Relaxation)

Day 7

Take a day off or practice 10 minutes of Savasana.

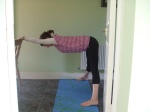
I have never met anyone who doesn’t enjoy this pose in some form. It is just fabulous for releasing tightness in the back and hamstrings. However, you have to be careful that the back doesn’t become dome-shaped. So use a chair in the beginning to learn (a) how to align the spine correctly and (b) how to rotate the pelvis forward around the tops of the thighs.In the full version of the pose, the head rests on the floor creating a gentle inversion for the body. This brings a fresh supply of blood to the head and heart, thus revitalising the entire system. As a forward bend, the pose cools and calms the mind. But don’t be tempted to go for gold just yet. Work with the chair first and get the alignment right, and in time this position will be one of the most rewarding in your repertoire!

How to practice Wide Leg Forward Bend (Part 1):

  • Stand arms-length away from the back of a chair. Make a very wide distance between the feet. Check that the feet are parallel.
  • Place your hands on your hips. Inhale, exhale, bend forward from the hips and hold the back of the chair. Take your head down in between the arms.
  • Each time you inhale, lengthen the entire front of the body. Also lift up the arches of the feet and the inner ankles. Each time you exhale, take the feet slightly further apart (but only if it is comfortable to do so) and lengthen the entire spine pushing back through the hips. The aim is to rotate the pelvis forward around the tops of the thighs until the sitting bones are in line with the ceiling. You can check this by reaching back and feeling for the bones. It could take a while before you get this movement. Most of us have very tight legs from so much sitting and this hinders the rotation of the pelvis. Take your time. When the sitting bones finally cooperate, you can do without the chair and move on to Part 2.
  • Stay for 6 breaths. To come up, each time you inhale, gradually shuffle the feet closer and closer together until you are back in Mountain Pose.

(Part 2)

  • As you exhale, take the feet slightly further apart (if possible) and rotating the pelvis further forward, place the hands on the floor underneath your shoulders (or on a yoga block or box if you can’t reach).  Do not rest the weight of the body on your hands but keep it on the pelvis and upper thighs.
  • Keep lifting the sitting bones and the tailbone up towards the ceiling. Relax the shoulders downwards. Look through the legs.
  • If you can, gently place your head on the floor.
  • Stay for 6 breaths. To come back up, each time you inhale, gradually shuffle the feet closer and closer together until you are back in Mountain Pose.

NEED HELP?  

If your back is dome-shaped, bend the knees slightly and work on rotating the sitting bones upwards from this stance instead.

~ If your legs are not strong or if they are very tight, sit astride a chair instead. Make sure both feet are parallel and then proceed as outlined above.

STOP!

~ Proceed carefully if you have any disc problems or are suffering from groin strain.

~ Do not bring the head lower than the level of the heart if you have glaucoma or detached retina.

This pose is a sort of a cross between Triangle Pose and Warrior Pose I. Most beginners find it quite tough as it requires good balance, strength, stamina and flexibility. So, I don’t introduce it until the last couple of weeks of a beginners’s course to give people a chance to develop these qualities through easier poses. The version I am describing here is a modified version using the wall and a radiator (if possible) to help you learn the correct alignment of the pose i.e. how to keep the head and neck and spine in line while practicing the position.

Side Angle Pose is a fantastic position. It stretches the entire side of the body from the outer edge of the heel right up into the fingertips of the extended hand. It also opens the hips and improves digestion. Like all standing poses, it increases strength and vitality.

How to practice Side Angle Pose:

  • Stand in Mountain Pose with your back against a radiator. Inhale, exhale and take your legs apart. The distance between your legs should be more than the length of one of your legs.
  • Inhale, exhale, and turn your right foot 90 degrees out to the right and your left foot 45 degrees inwards. At the same time, extend your arms out to the side at shoulder height with your palms facing the floor.
  • Inhale, exhale and begin to bend your right knee until the back of the knee is in line with the right heel. Do not bend the knee further than this point.
  • Inhale, exhale, and with the back of your head in contact with the wall, lengthen the entire right side of the body and slide it down the wall to the right, until you can place your right hand on the radiator. If this is not possible, bend your elbow and rest your lower arm on your thigh.
  • Keeping your left arm in contact with the wall, stretch your left arm overhead so that the left side of the body forms one continuous  line from the outer edge of the left heel, right up the side of the body, into the left arm and all the way into the fingertips of the left hand. The palm faces outwards with the back of the hand resting against the wall. Resist the temptation to rest the weight of the body into the hand or arm. Instead, the pelvis and upper thighs should be doing most of the work to keep you supported. Look straight ahead.
  • As you inhale, stretch up into the fingertips. As you exhale, keep the tailbone moving down towards the left heel. The right knee tends to collapse inwards so keep resisting it outwards.
  • Hold for 6 breaths. Repeat on left side. Repeat x1.
  • Eventually, when you are confident in the position, you can come away from the wall. You can also try the full version of the pose by extending the side of the body fully and placing your hand near the inside of the foot of the bent leg. But DO learn this version from an experienced teacher.

NEED HELP? This is a demanding position so only practice it when your energy is high. For this reason, also, do not practice the pose more than twice a week.

STOP! ~ DO NOT take your arm over your head if you suffer from high blood pressure or heart problems. Place it on your hip instead.

~ Go easy if you suffer from lower back problems, prolapse of the uterus or knee problems. If your legs are flexible enough, you could practice the pose sitting astride a chair. The same applies to women in the later stages of pregnancy.

The spine can move in 4 ways:  it can bend forwards and backwards, rotate to the right and left and it can bend to the right and left. Yoga encourages us to move the spine in all of all these ways to ensure maximum flexibility. This is why it is important to practice a  wide range of yoga postures and not just to practice a few favorite poses, tempting as that is!

In Triangle Pose, the spine bends to the side, or bends laterally, if you want to be fancy about it. The body forms 5 triangles, hence the name. It is a wonderful position for the hips, in particular, which tend to degenerate prematurely, due to our mainly sedentary lifestyle. Triangle tones them up and makes them flexible again.  However, like Warrior Pose, it is quite a technical position and there’s lots of bits and bobs to learn about it. Otherwise, the spine goes out of alignment and you end up putting pressure on the discs. Plus, the neck does funny things in this pose. Therefore, I favour the straitjacket approach i.e. I tell students to practice the pose against a wall which restricts their movement and forces them into aligning their spines correctly. The ideal situation is if you can place your hand on a radiator. If not, a chair placed beside the wall will do. Learn the leg and hip movements first, before adding in the arm movements. Go slowly and take your time learning this one. Bad habits take only minutes to learn, but years to unlearn. Speaking from experience, yet again…

How to practice Triangle Pose:

  • Warm your hips beforehand. Stand with your feet slightly wider than hip-width apart. With the knees bent, swing from side to side: navel, chest, right shoulder…then navel, chest, left shoulder. Repeat several times.
  • Stand with your back against a radiator. If this is not possible, stand with your back against a wall with a chair placed on your right side about a foot away from you. The seat of the chair should be facing you.
  • Inhale, exhale, and take your feet apart about 3.5 – 4ft (1-1.2m).
  • Inhale, exhale, turn your right foot out to the right (90 degrees) and turn your left foot in slightly (about 45 degrees). At the same time, take your arms out to the sides to shoulder height.
  • Now, check (a) that your hips are facing forwards; (b) that your right heel is in line with the centre of your left foot; (c) that your arms are in line and that your hands are in contact with the wall; (d) that the back of your head is in contact with the wall.
  • Inhale, exhale, and move your left hip out to the left. (Think of the way the hip moves to the side in the nursery rhyme in I’m a Little Teapot or the hip movement of a petulant teenager as they put their hands on their hips and say “So!” )
  • Inhale, exhale, and start slowly sliding the back of the head, the right shoulder and the right arm  down the wall towards the right side until you can place your right hand on the radiator or on the seat of the chair.
  • Now, start sliding your left arm up the wall (with the palm of the hand facing outwards) until it is in line with the crown of the head. Rest the back of the hand on the wall.
  • Breathe in and out for 6 breaths. As you inhale, stretch up into the fingers of your left hand. As you exhale, keep moving your left hip back towards the wall and your tailbone down towards the left heel. However, do not over strain in the hip.
  • Look straight ahead. (Note: Many yoga books show photos of people looking up at the hand overhead but this is not advisable until you know the pose really well.)
  • To come out of the pose, inhale and slowly slide the left arm down the wall again and bring the right side of the body back upwards. Repeat on other side. Repeat x 2-3 times.
  • When you understand alignment in the position, you can come away from the wall and place your hand on your leg instead. You can then keep moving your hand further down your leg until you can place your hand on the floor, maybe… It depends on the flexibility of the hips. If you never get past the radiator stage, it doesn’t matter. It’s still Triangle Pose and your hips will love you anyway!

NEED HELP?  If you find the pose strenuous, wait for a day when your energy is higher. Triangle Pose improves your vitality, but first you need to have enough energy to practice it.

~If you are very stiff in the hips, try placing your hand on the back of a chair instead of the seat.

STOP! DO NOT take the arm overhead if you suffer from high blood pressure or heart problems. Place your hand on your hip instead.

~ Proceed very carefully, if you have hip problems or disc problems. If necessary, place your hand on your hip instead of taking it overhead. This will reduce the pressure of the bend.


Years ago one of my students complained that she didn’t like practicing the warrior poses because she didn’t want to develop an aggressive nature. Since then I always stress to people that the point of the warrior positions (there are 3 of them) isn’t to encourage you to go around beating up little old ladies but to help you conquer your inner brat. Because as well as developing physical strength and stamina, these positions help you to develop courage, confidence and determination: qualities that help you defeat your lower nature and become a more whole human being.

That said, although Warrior I is doable for total beginners of Yoga, it is nevertheless, a demanding posture which exercises all the muscles and joints of the body. So, only practice it when your energy levels are good. Also for this reason only do the pose twice a week at the most. In the beginning, only practice the leg movements adding in the arm movements when your stamina improves. This is quite a technical position and it will take some time to learn fully. Don’t get impatient with it but try and learn one new thing about the pose each time you practice it. You can do without the wall when you are confident in the position.

How to practice Warrior Pose I:

  • Stand in Mountain Pose with your back against a wall. Inhale, exhale and take your feet apart. The distance should be more than the length of one of your legs.
  • Inhale, exhale, and turn your right foot 90 degrees out to the right and the left foot slightly inwards (about 45 degrees). Check that the heels of both feet are in line.
  • Inhale, exhale, and take the arms out to the sides in line with the shoulders , palms facing the floor. Keep the right buttock, the upper back, the backs of the hands and the back of the head in contact with the wall.
  • Inhale, exhale, and slowly begin to bend the right knee. Continue gradually bending the knee over the course of a few breaths until the back of the knee is in line with the heel. Do not let the knee go further than this line.
  • Hold the pose for up to 6 breaths. As you inhale, lift your abdomen away from the tops of the thighs. As you exhale, keep the tailbone moving down towards the backs of the knees and the right knee moving towards the little toe of the right foot.
  • Also check that you feel a stretch (a nice one!) in 3 areas – across the chest, across the front of the pelvis and along the right inner thigh.
  • Keep the shoulders relaxed down but keep the sternum lifted upwards.
  • Look straight ahead, then look about 2 inches below nose-level.
  • Act like a warrior about to throw a spear. Think strong, focused, decisive.
  • Inhale, straighten the knee and come back to Mountain Pose again. Repeat on the other side. Repeat x2

NEED HELP? If you find the pose too strenuous, keep the distance between the feet narrow. Work on the leg movements only until you get stronger.

STOP! DO NOT take your arms to shoulder height if you suffer from high blood pressure or heart problems. Place your hands on your hips instead.

~Be very careful if you have knee problems. If possible, have someone support the bent knee as you practice the pose.


It is estimated that we only use about one third of our total breathing capacity. This is due to the twin evils of poor posture and a sedentary lifestyle.  This means that we only take in one third of the prana or life force present in the atmosphere. Could it be that our lives are only a third of what they would be if we were living at our full potential? Now there’s a frightening thought!

The following breathing exercise allows you to practice deep, diaphragmatic breathing without any restraints or controls. The raising of the arms mimics the action of floodgates opening to allow water flow into a plain. The slower you move your arms, the more air and prana you will allow into your lungs. As you exhale, you lower the arms slowly to the ground again. In the second part of the exercise, you can also raise the hips on inhalation allowing you to breathe in even more fully. The  main thing is to move very slowly and always in tandem with the breath.

  • Lie on your mat with your knees bent and hip-width apart. You now need to lengthen your neck. Clasping your hands around the back of the head, gently lift it up off the floor. Supporting your head with your hands, slowly slide the hands over the back of the head feeling the neck lengthen as you do so. When the fingers reach the crown of the head, carefully place the back of your head back down on your mat again.
  • Place your arms lying down by your sides.
  • Focus for a moment on the parts of the body in contact with the floor: the soles of the feet, the lower back, the upper back, the arms and the back of the head. Each time you exhale, allow these parts of the body to settle into your mat.
  • Lift your right shoulder off the floor. Inhaling, broaden it out to the side as far as possible. Exhaling, lower it down on to the mat again. Repeat on left side.
  • Opening your eyes as wide as possible, look up at the ceiling. Then look down at the tip of the nose, and slowly draw the eyelids down over the eyes.
  • Inhale slowly through the nose, and then exhale deeply through the mouth with a long sigh.
  • Go back to breathing in and out through the nose and continue to  observe the breath for a few moments.
  • The next time you breathe in, slowly take the arms overhead (palms facing), and place them on the floor behind you. As you begin to exhale, slowly, take the arms back over the head and rest them on the floor. Continue in this way for 6 breaths moving very slowly. Think of the floodgates opening and closing to control the flow of water.
  • If you wish for the next 6 breaths, as well as raising the arms, also lift the hips off the floor on inhalation. As you exhale, lower both the arms and the hips back down again onto the floor. Work slowly and gently.
  • Afterwards, lie quietly on your mat and rest for a few moments before coming back up to sitting.

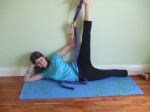
Serpent Pose may look  a bit scary at first, but once you get yourself there, it is actually a nice, restful position. So restful in fact, that the position is called after Ananta, the serpent whose coils formed the couch where the Hindu god, Vishnu would relax. For this reason, it is often called Couch Pose.

In the beginning, practice the pose against a wall as aligning the spine is crucial i.e. no banana shapes. It will also help you retain your balance for longer. Serpent Pose is fabulous for opening the pelvis and stretching the legs. People do find if tricky in the beginning but if you persevere with it, you will have amazing legs! Eventually, you can move away from the wall.  However, you need to align yourself along the edge of your mat – again, no banana-shaped spines. Also you may be able to throw away the belt and hold the big toe with your thumb and middle finger instead. But it usually takes some time. Work gently always and within your limits.

How to practice Serpent Pose:

  • Make a loop in a yoga belt or in a long scarf and tie it around your right foot.
  • Lie on your left side against a wall. Rest the back of the head, the back and the back of the left leg against the wall. Your right leg will be resting on top of your left leg. Keep the little toe of the left foot in view at all times as this will help you balance. Also keep your left leg active and sharp.
  • Bend your left elbow so that you can rest your head comfortably against your right hand. Your body should now form a straight line from the little toe of the left foot all along the left side of the body into the elbow.
  • Bend your right knee and bring it in towards the chest, supporting it with your right hand. Hold this position for a couple of breaths.
  • Inhale, exhale, and pulling on the belt/scarf, extend the right leg up towards the ceiling with the inner leg and the toes facing your head. Do not stretch the leg more than is comfortable. Keep the knee bent if you have to.
  • As you inhale, encourage the right leg to lift gently out of the hip. Exhaling, move your right foot in the direction of your head. Keep your head facing forwards and relax your arms, shoulders and the sides of your neck. Work in this way for 6 breaths.
  • Inhaling, bend the knee and bring it in towards the chest as before. Hold it there for a couple of breaths, before lowering the leg completely.
  • Change sides and repeat.

NEED HELP? If you find this pose too difficult, practice Supine Big Toe Pose (Supta Padangusthasana) until your legs become more flexible.